If you’re a coffee lover, you know that Keurig machines are a fantastic way to get the perfect cup of coffee every time. Unfortunately, like any other appliance, Keurig machines can develop problems, particularly with their bottom needles. These needles are used to puncture the bottom of each K-Cup, allowing hot water to flow through and brew the coffee.
However, if the needle becomes clogged or broken, it can cause the machine to malfunction or stop working altogether.
So, what can you do if your Keurig’s bottom needle is broken? In this post, we’ll give you some tips on how to fix the issue and get your machine working like new again.
Identifying the Issue
If you’re experiencing difficulty with your Keurig brewer, particularly with the bottom needle breaking, you are not alone. This is a common issue that can occur due to various reasons such as constant use, mineral buildup, or overheating. The needle, which punctures the cup and allows water to flow into it, is an essential component for brewing a cup of coffee using a Keurig.
Related Post: Keurig Not Dispensing Full Cup
The good news, however, is that this can be fixed. To resolve this issue, you will need to order a new bottom needle and replace the existing one. It’s a straightforward process that requires the removal of the old needle and installation of the new one.
If you’re unsure of how to do this, refer to the manufacturer’s instructions or reach out to their customer service for assistance. By fixing your Keurig’s bottom needle, you can continue to enjoy your favorite coffee without interruption.
Signs Your Bottom Needle Is Broken
If you’re experiencing issues with your sewing machine, it’s important to identify the problem quickly. One common issue is a broken bottom needle, but how can you tell if this is the problem? One sign is when the machine starts skipping stitches or when the thread keeps breaking. This could be caused by the needle hitting the bobbin casing or timing issues within the machine.
Another sign is when the fabric is not feeding through the machine smoothly or consistently, causing uneven stitches. If you notice any of these issues, it’s important to inspect the needle closely. Look for any visible signs of wear or breakage, such as a bent or broken needle tip.
If you suspect your needle is broken, it’s important to replace it immediately to prevent further damage to your sewing machine. Remember, a broken needle can cause more than just issues with your stitching – it can also damage your machine’s timing and other internal components. So, always be sure to inspect and replace your needles regularly to keep your machine running smoothly.
Causes of a Broken Bottom Needle
One of the most common issues that embroiderers face is a broken bottom needle. This issue can be caused by multiple factors, including using the wrong needle size, having a dull or damaged needle, or using thread that is too thick for the needle size being used. Identifying the issue is crucial because, without proper diagnosis, the same issue may continue to occur and cause frustration.
It’s recommended to first check the needle size, ensuring it is correct for the thread being used. A dull or damaged needle can also be easily identified by inspecting the point for any bends or burrs. Lastly, using a thread that is too thick for the needle size can cause the needle to break and result in a damaged project.
By properly identifying the cause of a broken bottom needle, an embroiderer can prevent the issue from recurring, ensuring a successful project.
Related Post: Fixing KeurigError Codes 8 and 6
Steps to Fixing Your Keurig
If your Keurig bottom needle has broken, don’t worry, it’s a common problem and can easily be fixed. The first step is to turn off and unplug your machine. Then, remove the water reservoir and the K-cup holder.
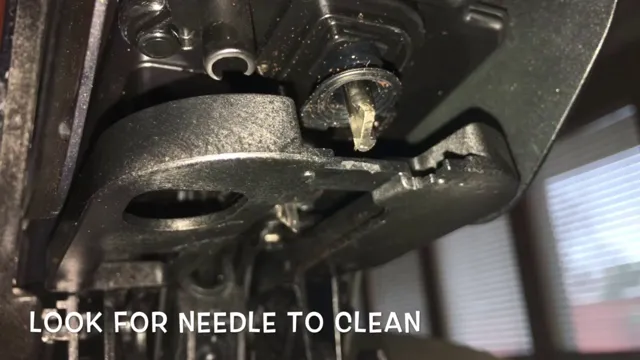
Next, use a paper clip or a toothpick to clean out any debris that may be blocking the piercing needle. If the needle is still broken, you can purchase a replacement part online or from a local store and follow the instructions provided to replace it. It’s important to note that regular cleaning and maintenance can prevent future issues with your Keurig, so make sure to descale your machine every three months and replace the water filter as needed.
By following these simple steps, you can enjoy your perfectly brewed coffee once again.
Step 1: Unplug Your Keurig and Remove the Reservoir
If you’re experiencing problems with your Keurig coffee maker, don’t panic! Fixing a Keurig can be much simpler than you think by following a few simple steps. The first step you should take is to unplug your Keurig and remove the reservoir. This is important since the machine should be entirely off before fixing it to avoid any danger.
The reservoir is the large plastic container located on the back of your Keurig that holds the water used to make your coffee. Gently pull the reservoir away from the machine and set it aside for the time being. By doing this, you’ll be able to access the internal parts of your Keurig and inspect them for any damage or debris.
Once you’ve removed the reservoir, you’ll have a clear view of the brewer’s assembly, which includes the K-Cup holder and brander needles. With proper care and maintenance, you can keep your Keurig in good condition and avoid future breakdowns.
Step 2: Disassemble the Machine and Find the Broken Needle
Keurig, fixing, disassemble, broken needle If your Keurig is not working correctly, one of the reasons could be a broken needle. To fix this issue, you’ll need to disassemble the machine and locate the faulty needle. Firstly, remove the water reservoir and detach the machine’s lid.
Next, find the screw located beneath the top cover and remove it to loosen the holder. Keep the holder in a safe place, so it doesn’t get misplaced. Now you can observe the interior of the Keurig and examine the needle for any damage.
If you notice that it is bent, broken or clogged, you’ll need to replace it with a new one to ensure your coffee maker runs smoothly. When working with your Keurig, it’s vital to handle the parts with care to avoid any further damage or complications. Once you’ve located the faulty needle, it’s a relatively simple fix.
With a new needle replacement, you’ll soon have your Keurig running as good as new.
Step 3: Replace the Broken Needle with a New One
Keurig, broken needle, fixing Once you have located the broken needle in your Keurig, it’s time to replace it with a new one. First, make sure you have the appropriate replacement needle for your model of Keurig. Carefully remove the broken needle and dispose of it properly.
Next, take the new needle and insert it in the same location where the old one was. Be sure to follow any specific instructions provided by the manufacturer to ensure proper installation. Once the new needle is securely in place, close the Keurig and turn it on to test it out.
If the Keurig is still not functioning correctly, it may be helpful to consult the user manual or seek professional assistance to further diagnose and address any issues. By replacing the broken needle in your Keurig, you can help ensure that your machine continues to function properly and provide you with delicious, hassle-free coffee for years to come.
Preventing Future Needle Breaks
If you’ve had the unfortunate experience of your Keurig bottom needle breaking, don’t worry, there are steps you can take prevent it from happening again in the future. One of the main causes of needle breakage is due to inaccurate insertion of the pod. Make sure the pod is properly aligned with the needle before lifting the handle.
Additionally, regularly cleaning your machine can also prevent needle breakages. Build-up of coffee grinds and other residue can cause the needle to become dull and break more easily. Before inserting a new pod, use a paperclip to clear out any debris that may be in the needle.
Lastly, be gentle when handling your Keurig and avoid putting too much pressure on the needle or the pod. By following these simple steps, you can prevent future needle breakages and ensure a long lifespan for your Keurig machine.
Tips for Maintaining Your Keurig’s Bottom Needle
Maintaining your Keurig’s bottom needle is crucial for ensuring that your machine works efficiently for years to come. One of the best ways to prevent future needle breaks is to avoid using dark roast or oily coffee blends. These types of coffee tend to cling to the needle and can cause clogging, making it harder for the needle to pierce the K-cup.
When this happens, you may be tempted to force the needle through, but this can cause it to become bent or even break. Instead, try using lighter roasts which tend to have less oil content and are easier on your Keurig’s needle. Additionally, routine cleaning can help prevent any build-up that could cause damage to the needle over time.
Taking these steps can help you avoid costly repairs and keep your Keurig machine running smoothly.
Cleaning Your Keurig to Avoid Needle Breaks
Keurig If you own a Keurig, you know how convenient it is to make a quick cup of coffee or tea. But, if you’ve ever experienced a needle break, you know how frustrating it can be. One of the main causes of needle breaks is buildup and debris in the needle area, which is easily preventable with regular cleaning.
To clean your Keurig, start by removing the pod holder and drip tray and wiping them down with a damp cloth. Then, use a paperclip to remove any clogs or buildup in the needle area. Finally, run a few cycles of water through the machine to flush out any remaining debris.
By taking a few minutes to clean your Keurig regularly, you can avoid needle breaks in the future and ensure your machine continues to make delicious drinks.
Final Thoughts and Recap
If you find yourself facing the frustrating situation of a broken bottom needle on your Keurig machine, don’t panic! It is a common issue, but the good news is that it is usually a simple fix that you can easily do at home. Firstly, unplug your machine and remove the water reservoir. Then, locate the needle and check if it is bent, clogged or completely broken.
If it is clogged, use a paperclip to clean it, and if it is bent or completely broken, replace it with a new one from the manufacturer. Always make sure to follow the manufacturer’s instructions when performing any repairs. Remember, regular cleaning and maintenance can prevent future issues with your Keurig machine, so it’s a good idea to give it some TLC regularly.
Don’t let a broken bottom needle stop you from enjoying your daily cup of coffee!
FAQs
How do I replace a broken bottom needle on my Keurig machine?
To replace a broken bottom needle on your Keurig machine, first, unplug the machine and remove any remaining K-cups. Remove the water reservoir and any other removable parts. Locate the bottom needle where the K-cup is punctured. Carefully remove the old needle by pulling it out from the bottom of the machine. Insert the new needle into the hole and push it in until it clicks into place. Reassemble the machine and plug it in again.
Can a broken bottom needle on my Keurig cause any damage to the machine?
Yes, a broken bottom needle on your Keurig may cause damage to the machine. The needle is an essential part of the brewing process and if it’s broken, the machine won’t function correctly. It may also cause problems with the pump, resulting in a slower brewing time, or overheating, potentially damaging the machine.
How often should I replace the bottom needle on my Keurig machine?
The bottom needle on your Keurig machine should be replaced every 6 to 12 months, depending on usage. If you use your machine frequently, you may need to replace it more often. If you notice any issues with your Keurig, such as a slow brewing time or a decrease in the amount of brewed coffee, it may be time to replace the needle.
Can I repair a broken bottom needle on my Keurig machine myself?
Yes, you can repair a broken bottom needle on your Keurig machine yourself, but it requires some knowledge of the machine and the right tools. You’ll need to order a replacement needle and carefully follow the instructions for replacing it. If you don’t feel comfortable doing it yourself, you can always take it to a professional or contact Keurig customer support for assistance.